September 14, 2017
Use Drawbot with GitHub and VS Code
My TypeMedia class is taking our first forays into Drawbot, a program that allows you to make drawings and animations programmatically with Python. To me, it feels a lot like CodePen for Python.
However, there are a few things that Drawbot doesn’t do that I’ve grown accustomed to in my exploration of web development. One thing is version control and collaboration, an essentially part of modern development – for this, GitHub is hard to beat. Another is offering a super-efficient code workflow with helpful extensions – for this, VS Code is my current favorite text editor.
Why use GitHub and VS Code?
GitHub, a website and service built around Git, is the de facto way software is developed today, and it offers a brilliant system for versioning, managing, and collaborating on code. Git is really smart, in that it stores each different version as only the changes it includes, versus the prior version. It also allows “branching” and “merging” and other features that enable exploration and collaboration. That may not make complete sense, but it’s a near-magical system that allows massive projects to have detailed histories, even with many, many contributors, all while helping these collaborators to avoid conflicts in their versions while working.
VS Code is a text editor for all types of code. It has a built-in file explorer, terminal, and Git manager, plus a thriving community building extensions that offer all kinds of productivity boosters. Writing code in VS Code is simply faster and more pleasant than in any other tool.
Using VS Code with Drawbot
Initially, I thought it would take some kind of VS Code extension to efficiently send code written in VC Code over to Drawbot, to run. After Googling and looking at various extensions meant to send text from VS Code to other apps and services, then looking for methods using a task runner like Gulp, I realized: you’re just editing the same document in two programs. Do you even need anything special to send text between them? As it turns out, not really.
Let’s say you create a file like hello_world.py in Drawbot. You can then open this in VS Code, type a new line of Python, hit ⌘ + S to save, and then hit ⌘ + Tab to move back to Drawbot. As soon as you’re back to Drawbot, the code updates. If you’re in “Live Coding” mode, it will also run instantly. If not, you can hit ⌘ + R to run, as usual.
Possibly, there is something that could act like BrowserSync does for web development, automatically running and injecting HTML, CSS, and JS on every “Save.” If anyone out there knows of such a tool, please let me know! Potentially, I may try again to find this, or find whether I can make this work on my own. Until then, however, editing the same file in both programs and toggling between them is pretty efficient for me, and certainly worth it to unlock VS Code as my text editor.
Using GitHub for a Drawbot project
First, let’s set up our remote repo on GitHub
-
If you don’t already have a GitHub account, sign up at https://github.com.
-
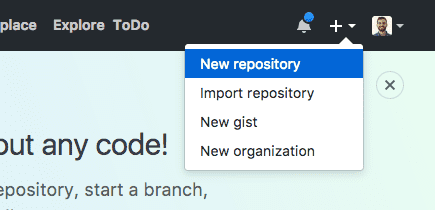
Next, you need a repository (“repo” for short – basically a folder for code). There are a few ways to create a new repository in GitHub, but one is to click the “plus” sign in the top right of the toolbar, next to your avatar.
-
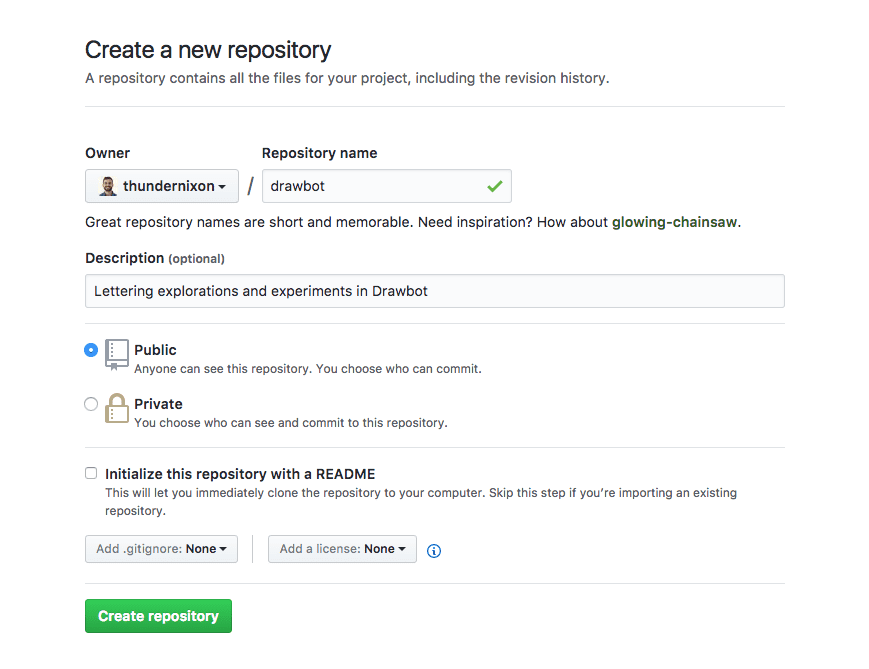
Give your repo a simple title, then add a brief description that would describe things to an outsider in one line.
-
Repos are public by default. Partly, this is because the spirit of software development on GitHub is to be opensource-first, so that others can see what you’ve made and build on it themselves. If you want private repos, you can pay $7/month. I haven’t had a good reason to do this yet, but I might at some point.
-
You can “Initialize this repository with a README” if you want to describe it further, but let’s skip that for now.
-
Click the green “Create Repository” button to create your repo!
-
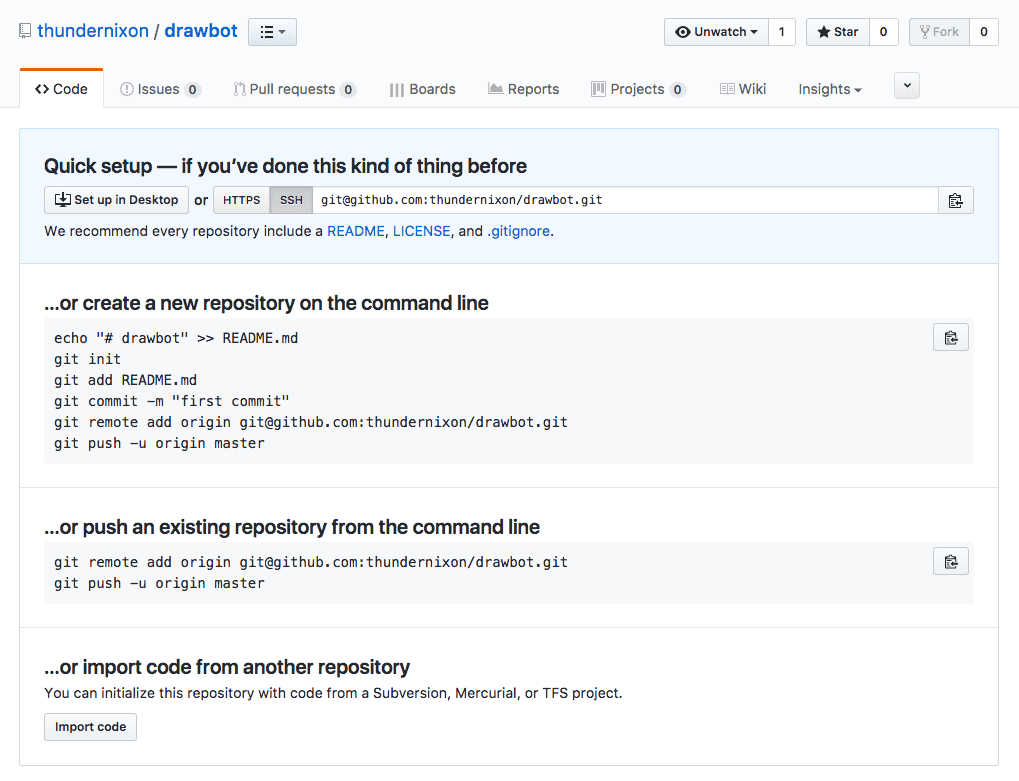
So long as you initialized without a README, you now see your repo, with instructions on how to set it up.
Set up your local repo
Now that we have a “remote” repo (on GitHub’s servers), we can hook it up to a “local” repo on our computer. For this, we will use a command line.
-
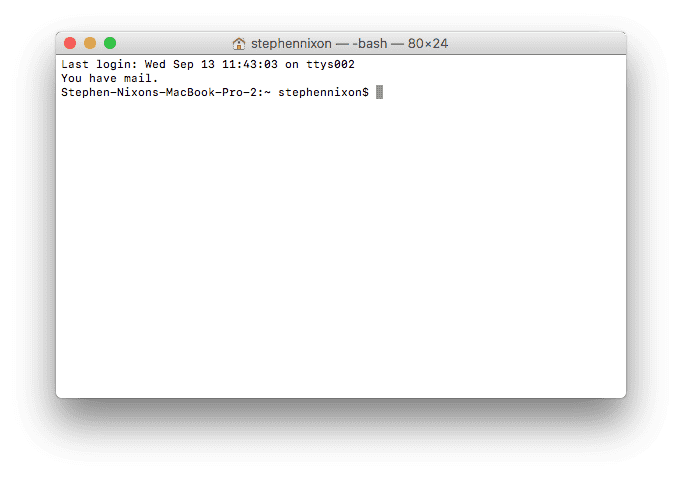
First things first: open up your terminal. If you haven’t used your terminal much before, open Mac Spotlight (the magnifying glass in the top right of your Mac screen), and type “terminal” to open the terminal app.
-
Now, we need to navigate to a folder where we want to keep our code project.
-
The terminal looks intimidating if you’re not used to it, but you really only need to know a few things to be comfortable in it.
- It’s a “command line interface” (CLI), where you interact with your computer through text commands, in contrast to “graphic user interfaces” (GUIs), where you use your mouse and interact with windows, buttons, etc. To run a command, you type it (or paste it in) and hit enter/return.
- Run
lsto “list” the files and folders in your current working directory (folders are called “directories” in the CLI) - Run
cd FOLDER1/FOLDER2/etcto change directory to folder1, folder2, etc. Note: these are placeholders for your folder names. So, iflsshows that you have a folder called “code,” you would runcd code. If you know that a project “tm-drawbot” is inside “code,” you could navigate directly to it withcd code/tm-drawbot - A simple way to navigate folders in the command line is by running
lsto see what folders and files exist at your current location, then runningcd FOLDERNAMEto navigate a level deeper, and repeating this - To make a new folder, run
mkdir FOLDERNAME, short for “make directory”, ( “FOLDERNAME” is your desired folder name). It tends to be convenient to match your project’s folder name with the project name on GitHub. To make a new file in the current folder, runtouch FILENAME. As you do this, keep in mind your current folder location (if you ever want to know this detail, you can always runpwd, short for “print working directory”. - The command line takes separates command pieces with word spaces. So, if you ever need to enter a file or folder name that includes a space, you must “escape” it with a backslash, like
cd folder\ name\ with\ spaces. For this reason, it tends to be useful to name folders and files with no spaces. - Handy shortcut: if you have Finder open, and you find the specific folder you want to be in in the command line, you can simply drag it into command line to add in the full pathname, escaped spaces and all.
- If you ever want to open your current directory in Finder, run
open .and it’ll pop open.
-
You’ve changed directory into the folder holding your project, correct? I sometimes forget to do this. If you haven’t, do so by using
lsandcdor via drag-and-drop, as described in step 1. -
Now we will set up the folder as a Git repo. Let’s look at the instructions from GitHub, line by line:
-
echo "# drawbot" >> README.md👈 this creates a README file in the folder, so you can describe it for others, later on -
git init👈 this “initializes” the folder as a git repo, by adding a hidden dot file -
git add README.md👈 this adds your README.md file into the git history -
git commit -m "first commit"👈 this makes your first “commit,” a signpost of where you are at in the history of the project -
git remote add origin git@github.com:YOUR_USERNAME/YOUR_PROJECT.git👈 this hooks up your local repo to the remote repo on GitHub. Note: make sure you copy the proper HTTPS or SSH URL from your GitHub repo -
git push -u origin master👈 this pushes your README up to the remote! Well done on your first git push! -
Hot Tip™: you can actually just copy/paste all six lines from GitHub into your command line and run them all at once, but it’s useful to know what each one does.
-
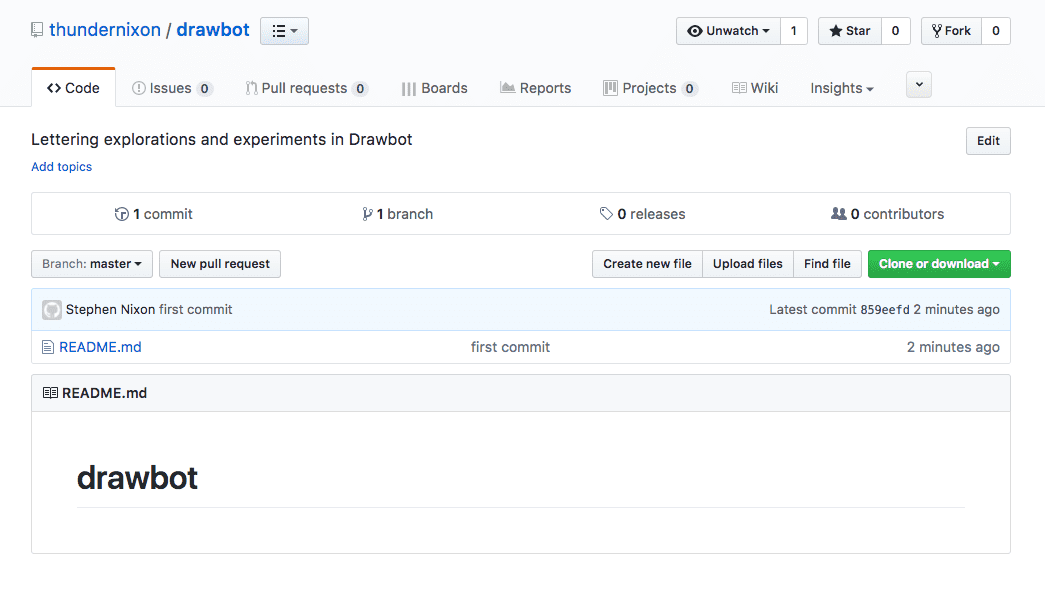
Now that you’ve pushed your project, go back to GitHub in your web browser, and refresh the page. It should now show that you have README.md in your project code, plus any other files that may have been in the folder you made into your git repo.
Now, let’s make a new version of your project
We’re going to work in VS Code just a bit, now. If you haven’t already, download it from https://code.visualstudio.com/. Once you’ve installed it, go back into your Terminal window.
-
Just like you can open the current directory in Finder by running
open ., you can open your current directory in VS Code by runningcode .– go ahead and do this now.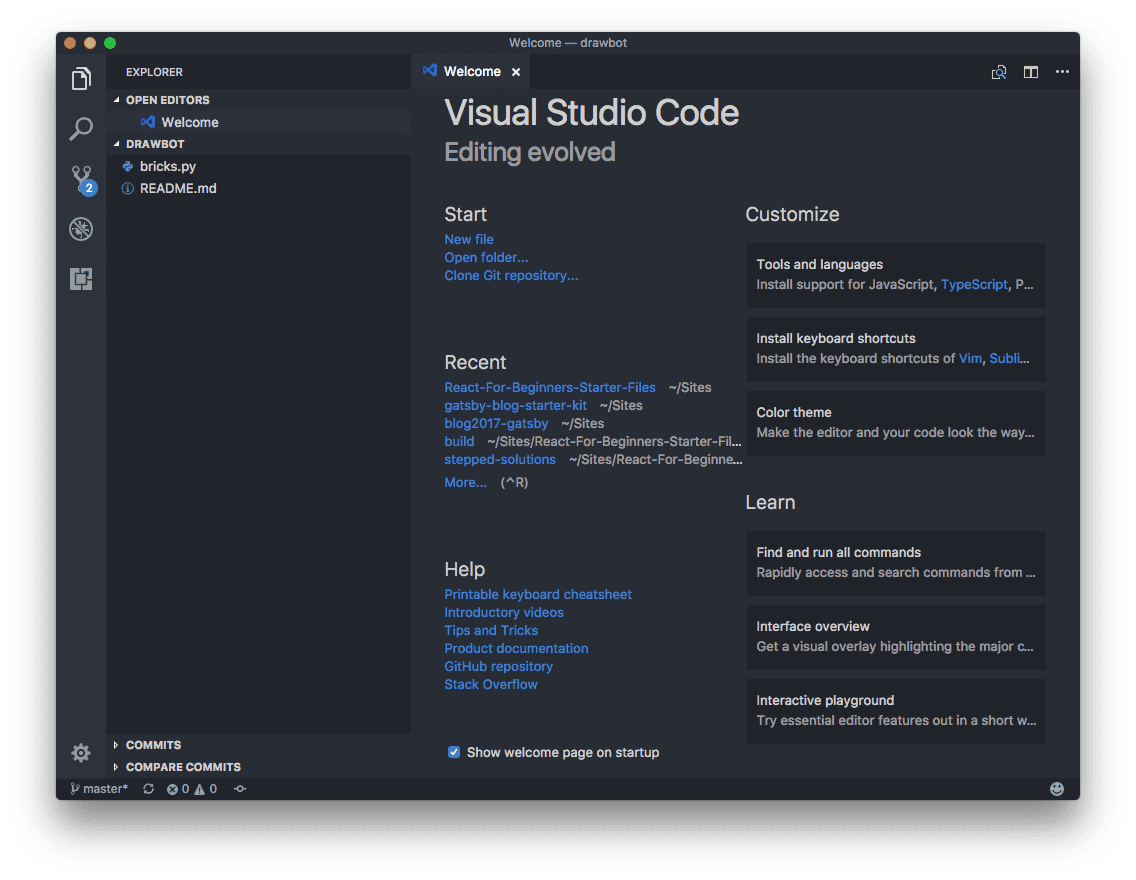
-
You should now have a VS Code window, along with your files displaying on the left side.
-
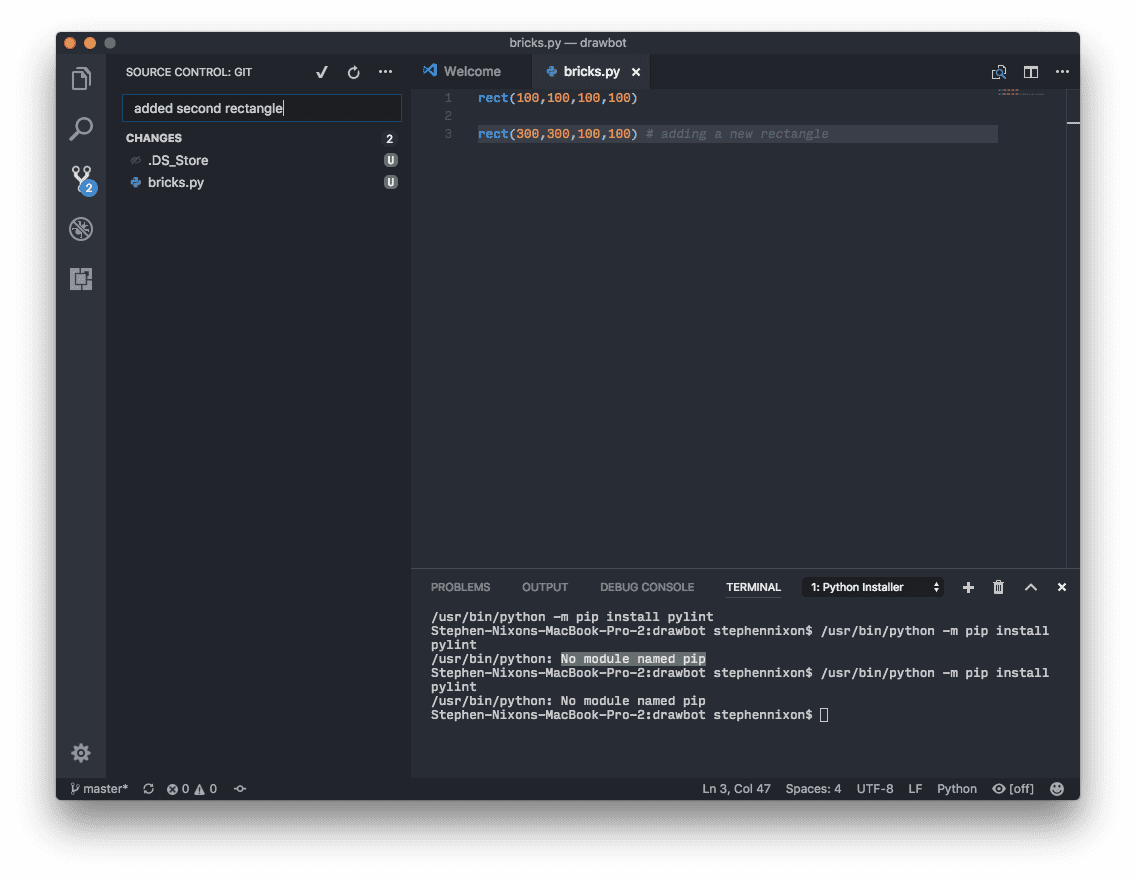
Try editing a file or creating a new one. If you’re following along with the Drawbot example, go into your drawbot script and make any change. I’ll add a second rectangle to my super-simple file.
rect(100,100,100,100) rect(300,300,100,100) # adding a new rectangle -
If VS Code prompts you to install “Linter pylint,” just click “Close” – we’ll handle this later.
-
If you don’t already have your script open in Drawbot, open Drawbot, then open the file you’ve just edited.
-
Edits in VS Code will show up in Drawbot as soon as you change from VS Code to Drawbot. You can change back and forth really quickly between apps with the shortcut
command + tab. You can navigate back further by holding downcommand, and either hittingtabagain or just by usingleftandrightarrow keys (this is incredibly useful for using a Mac in general, so if you aren’t already using it … try it: you’ll love it). -
Now for the cool part: using VS Code’s built-in Source Control manager (SCM). See how there’s a few icons on the left bar of VS Code? Click the one with the number badge on it. This will show the SCM sidebar. Any time you save a change to a file in a git repo, it will be added to this SCM sidebar.
-
When you click into the SCM sidebar, you should automatically be in the text input box – if not, click into it. Write a “commit message” here.
- A commit message can be anything short, but good commit messages are present-tense descriptions of the change(s) you’ve made, so that another person (or yourself, in the future) can see it in the git history and have a good idea of what changed with a given commit. Commits should happen pretty frequently, so you should never have to describe very many changes in any one commit message. If you are making a website, an example commit might be “Increased logo size” or “Changed button color in footer.”
- Here, I will write “added second rectangle”
- Use
command + enterto make your commit. The files that were under “Changes” are now “commited” to your Git history, as a distinct point you can revert to in the history, if you want to (with the whole project, or just with a specific file or files).
-
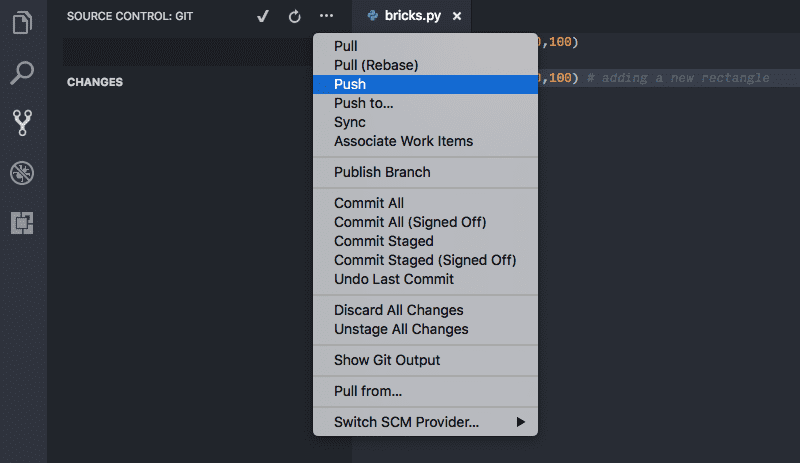
Now, we just need to push your changes, so they’re on GitHub, and both backed up and ready to collaborate on and/or manage. Click the ••• icon in the top of the SCM sidebar, and select “Push.”
-
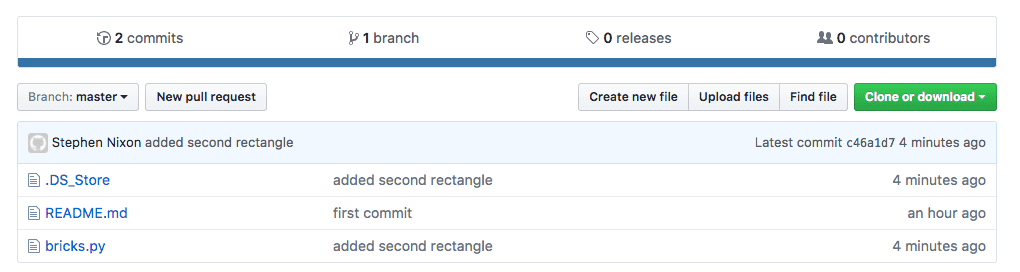
Go to GitHub, and refresh the page. You should see your edited file, your commit message right next to it, and the time since you committed the change. Files that were changed earlier show their distinct commits.
💥 Boom! 💥
You’ve made remote and local repos, edited your project in VS Code, and committed and pushed to GitHub. Now, you can keep track of your project, safely experiment, add and track to-do’s with GitHub issues, and ask other coders to collaborate, whether they’re a across the room or across the world.
Notes
-
If you followed along closely, your GitHub repo now has the file
.DS_Storein it. It doesn’t really matter, but it doesn’t need to be there – it’s a macOS file, so we can remove it and “ignore” it in the future. Add the file.gitignoreto the top-level of your project, and write.DS_Storein it (nothing else, for now). Make a commit like “Add gitignore with DS_Store.”- Then go to your terminal, and in the project directory, run: git rm -r —cached . git add .
- That recursively removed all files from the Git Index, and then added in everything not set to be ignored (so, it will work with one ignored file or many). Now, commit that change: git commit -am “Remove ignored files”
- And to send this cleaned-up state to GitHub, run
Git Push, or push from VS Code (these both do the same thing). - Answer found on Stack Overflow
- Using Git tends to involve a fair amount of Googling. 90% of the time, VS Code has the functions you need, but occasionally, you’ll need to Google how to do certain things. To learn more about what you can do with Git, the book Git for Humans is excellent. There are also lots of great docs and tutorials available for free online. If you’re in class with me, you can also ask me if Google and/or Stack Overflow aren’t turning something up within a few minutes of searching.
- If you’re only ever working in the command line when you’re also in VS Code, you might find it convenient to simply use the Terminal that is built into VS Code. For this, just go to
View > Integrated Terminal, or use the shortcutcontrol + backtickiTerm2 is a nice upgrade from the standard Mac terminal. - Are you having issues with the pylint linter install? If so, let me know, and I can let you know if I’ve figured it out, myself.
- One more fun thing about VS Code: you can control the color theming for each “workspace,” which is typically a project folder, but can also be any folder. For example, for this blog, I use my default theme, One Dark Pro Vivid, but in the subfolder that holds the markdown for blog posts, I’ve set up a light color scheme, so it feels a bit more like a writing environment. You can edit the sidebar, tabs, everything. Give it a shot!